


There's a fantastic show called Klustered on Rawkode's YouTube channel, which is focused on showing its viewers different ways to debug a Kubernetes cluster. The unique thing about this show is that there are usually two teams (or people) trying to debug and make the Kubernetes cluster broken by the other team (or person) operational again.
You may be wondering why I'm talking about Klustered when the title of this article is centered around something else. I'll tell you! It's because I discovered Teleport during my time as a guest on Klustered. I was in awe of the platform and the things it could help me and my teammates achieve.
After the show, I decided to learn more about the capabilities of Teleport, and that was when I realized that it was more powerful than I had imagined. So, I decided to write an article about how you can use Teleport to give developers secure access to Kubernetes Clusters.
What is Teleport?
The creators of Teleport say it is the easiest and most secure way to access infrastructure.
In my opinion, Teleport is an open source multi-protocol access proxy that allows developers and security professionals to unify access for SSH servers, Kubernetes clusters, web applications, and databases across all environments. It consolidates identity-based access to your infrastructures, helps you meet compliance requirements (e.g., MFA, RBAC, etc.), and also gives you full visibility into the access and behaviour of your infrastructures.
Even though Teleport can be used to access different infrastructures anywhere in the world, this article is only focused on explaining how it can be used to give developers (or any other person who needs it) secure access to Kubernetes clusters.
What are the benefits of using Teleport?
Before getting hands-on with Teleport, I thought to share some benefits of Teleport and include real-life scenarios on how each of these benefits can positively impact the workflow, productivty and security of development teams using Kubernetes.
1. Teleport provides identity-based access to your Kubernetes cluster
Teleport gives every developer, infrastructure resources (VM, K8s cluster, Database or Windows Server), and application an identity, thereby neutralizing security threats and reducing the impact of breaches.
This means that anybody who doesn't match the identity you've set up will not be granted access to your Kubernetes cluster, and the identity and interactions of those who have access to the Kubernetes cluster can be easily identified & monitored for security reasons.
Scenario:
Most organizations use traditional approaches like passwords or private keys as a means of securing access to their Kubernetes clusters. But this isn't very scalable and secure as it requires manual effort, and the password can be exposed mistakenly. On the other hand, using Teleport to provide secure access to your Kubernetes clusters means that you can implement a single sign-on authentication scheme using GitHub or other supported SSO providers on your Kubernetes cluster to ensure that only members of a specified team can access the Kubernetes cluster.
2. Teleport gives you full visibility of all activities performed on your Kubernetes cluster
Teleport provides a way for you to see all the activities that have been performed by every single person that accesses your team's Kubernetes cluster. This visibility comes in three formats; session recording, unified audit logs, and a live view.
The session recordings can show you every kubectl session by a developer or service account. The unified audit log shows you all security events across all clusters in a single location, and the live view displays all online clusters, active kubectl sessions, and access requests.
Scenario:
Instead of having a panic attack when trying to figure out why a service in the cluster is down or why something isn't working as it used to, you can use Teleport's audit log, sessions, and live view as a source of truth to view all the activities performed, who carried them out and figure out what most have caused the error or bug. With Teleport, debugging and analyzing bugs is now easier than ever.
3. Teleport helps you implement best pratices for Kubernetes access easily
In a world where hackers have successfully been able to attack some of the most secured companies, the importance of going the extra mile to secure your team's Kubernetes cluster cannot be over-emphasized.
Teleport uniquely addresses these modern security challenges of today by enforcing the Zero Trust security approach, thereby making it easy for development teams to implement industry best practices for Kubernetes access (e.g., MFA, RBAC, & SSO using identity-based short-lived X.509 certificates for developers and service accounts) with minimal configuration.
Scenario:
If you only want Developer A to have edit access and Developer B to have only viewing access to the Kubernetes cluster, you can easily do that by either running a few commands on your CLI or directly on the Teleport web user interface with just a click.
You may be thinking "I can set up RBAC without Teleport so what's the essence of using it", but the interesting thing is Teleport just doesnt stop at allowing you set RBAC through a user interface, it also makes the approval process of Kubernetes access less stressful. For instances, if Developer B can fix a particular bug but doesn't have access to edit resources on the Kubernetes cluster, all they need to do is click on the request access button on Teleport and it can be approved via Slack or other supported plugins.
And that's not even all. Teleport also supports short-lived access to Kubernetes clusters. This means that Developer B can only be given edit access to the Kubernetes cluster for a limited duration of time.
4. Teleport makes you more productive
A single login gives developers access to all Kubernetes clusters across all environments. This means you can leave behind configuration complexity, juggling shared credentials and hopping between VPNs and access points.
Hands-on! Let's see Teleport in action
Now that you know all the fantastic ways Teleport can help boost a development or DevOps team's workflow, productivity, and security, I'll show you how to set up Teleport on a Kubernetes cluster.
Let's dive in. 🧑🏿💻👨💻
Step 1: Navigate to your preferred Kubernetes Cluster & install Teleport
Most organizations usually have more than one Kubernetes cluster, so the assumption is that you have a certain Kubernetes cluster you want to try using Teleport on. So, navigate to the context of that Kubernetes cluster using your preferred tool. I'm using Kubie in my case.

Next, run this command helm repo add teleport https://charts.releases.teleport.dev to add the teleport-agent chart to your charts repository.

With the teleport-agent chart now available in the Kubernetes cluster, the next thing you'll be required to do is install a single node teleport-cluster, provision a cert using ACME and switch to the context of the teleport cluster by running the command below on your CLI:
helm install teleport-cluster teleport/teleport-cluster \
--create-namespace \
--namespace=teleport \
--set clusterName=${CLUSTER_NAME?} \
--set acme=true --set acmeEmail=${EMAIL} \
Don't forget to update the --clusterName with a unique hostname which will serve as the public endpoint to your Kubernetes cluster (we will eventually set this up for DNS later using the teleport-cluster external load balancer IP address) and set the --acmeEmail to use an email address that will be receiving correspondence from the Letsencrypt certificate authority.

For context, the single node teleport-cluster contains:
The Teleport Auth Service which is in charge of issuing certificates & conducting authentication challenges.
The Teleport Proxy service which handles user requests, forwards user credentials to the Auth Service & communicates with Teleport instances that enable access to specific resources in your infrastructure.
Step 2: Setup DNS for the hostname and IP address
The IP address of the teleport-cluster external load balancer will be used to set up DNS for the hostname you added when you were setting up --clusterName. Confused? Look at the commands in step 1 again. 😃
To confirm the teleport-cluster is running, run this command kubectl get pod and then run the kubectl get services command to view the pod's external IP address.

Copy the external IP address and go over to your DNS provider which is Cloudflare in my case and create a DNS record for the hostname and external IP.

This will take a couple of minutes or hours to propagate. But you can use dig to confirm if the DNS records are propagated:

And curl to confirm that Teleport is running:

Step 3: Create a local user
Even though Teleport allows adding a Single sign-on authentication scheme, it is advisable to create a local user (a Kubernetes role object that can be used to assign roles to your teammates) as it serves as a reliable fallback when an SSO provider is down.
Let's go ahead and create a local user by adding the YAML content below into a local-users.yaml file. For context, the YAML configuration file below contains data that will create a Kubernetes role object named member.
kind: role
version: v5
metadata:
  name: member
spec:
  allow:
    kubernetes_groups: ["system:masters"]
    kubernetes_labels:
      '*': '*'
    rules:
    - resources:
      - '*'
      verbs:
      - '*'
Before creating a role with the local-users.yaml file, run this command POD=$(kubectl get pod -l app=teleport-cluster -o jsonpath='{.items[0].metadata.name}') to get the exact name of teleport-cluster pod and map it to a variable named POD.
Now, let's create the role by running this command: kubectl exec -i ${POD?} -- tctl create -f < local-users.yaml and then add a user named "didi" to the role by running this command kubectl exec -ti ${POD?} -- tctl users add didi --roles=member. This will generate a link that we can send to the user we just added to give them access to Teleport.

Anyone who clicks on the link (https://teleport-demo.edidiongasikpo.com) will be directed to the Teleport Welcome page and will need to click on Get Started to trigger the account creation process, add the required information and click the "Create Account" button to access the team's Kubernetes cluster.

As you can see from the screenshot below, the user "didi" now has access to the Kubernetes cluster via Teleport's web interface in a safe and secured state.

Step 4: Use GitHub's SSO on Teleport
You've successfully set up one local user, but doing this for your whole team will be time-consuming. Thankfully, Teleport is all about helping your DevOps team move fast while staying secured, so there's an option to connect to various SSO providers. In this section, I'll show you how to use GitHub's SSO on Teleport.
Go to your team's GitHub organization page -> Settings -> Developer Settings -> New OAuth App -> Add the required information and click the Register application button.

Now, create a file named github.yaml and paste the contents below into it. Remember to update the client id, client secret, redirect URL, and GitHub organization name with that of your team.
kind: github
version: v3
metadata:
  # connector name that will be used with `tsh --auth=github login`
  name: github
spec:
  client_id:  <insert client id here>
  client_secret:  <insert client secret here>
  # This name will be shown on UI login screen
  display: GitHub
  redirect_url: <insert your domain name here>/v1/webapi/github/callback
  # Map github teams to teleport roles
  teams_to_logins:
    - organization: <insert GitHub organization name here>
      team: admin            # GitHub team name within that organization
      logins:
        - member
Then run this command kubectl exec -i ${POD?} -- tctl create -f < github.yaml to create the GitHub authentication connector.

Go back to your Kubernetes cluster's domain name, in my case teleport-demo.edidiongasikpo.com and you'll notice that the GitHub SSO has been added as a sign-in option.

Clicking on the GitHub button will direct you to GitHub's Authorization page, where you'll click on the Authorize button to gain access to Teleport. With the GitHub SSO setup now completed, any developer who is part of the team you specified in the github.yaml file will now be able to log into Teleport and access the Kubernetes cluster - this increases the level of security and controls who can access your team's Kubernetes cluster.
Step 5: Connect to the Kubernetes cluster
Now, let's assume user "Didicodes" wanted to access the Kubernetes cluster you've just added to Teleport. She'll typically go to the hostname you gave to the cluster which is teleport-demo.edidiongasikpo.com in our case and sign in using GitHub or as a local user. On the web interface, she'll click on the connect button, which will display a list of commands she needs to run to connect to the Kubernetes cluster.

She'll have to run these commands on her CLI because Teleport doesn't have a kubectl user interface at the time of this writing. This is good as Didicodes can maintain the existing workflow of running kubectl commands on her CLI. To run these commands, Didicodes needs to download a tool called tsh - it allows end-users to interact with Teleport and will download a short-lived kubeconfig for your users.
With tsh now installed on Didicodes computer, she'll run this command to log into Teleport: tsh login --proxy=teleport-demo.edidiongasikpo.com:443 --auth=github.

Didicodes will then run tsh kube ls to list the clusters she is connected to via Teleport and then run tsh kube login teleport-demo.edidiongasikpo.com to connect to the specified cluster. If this works as expected, Didicodes will now be able to access the resources inside the Kubernetes cluster (of course, only the resources she's been given access to by the admin of the K8s cluster).
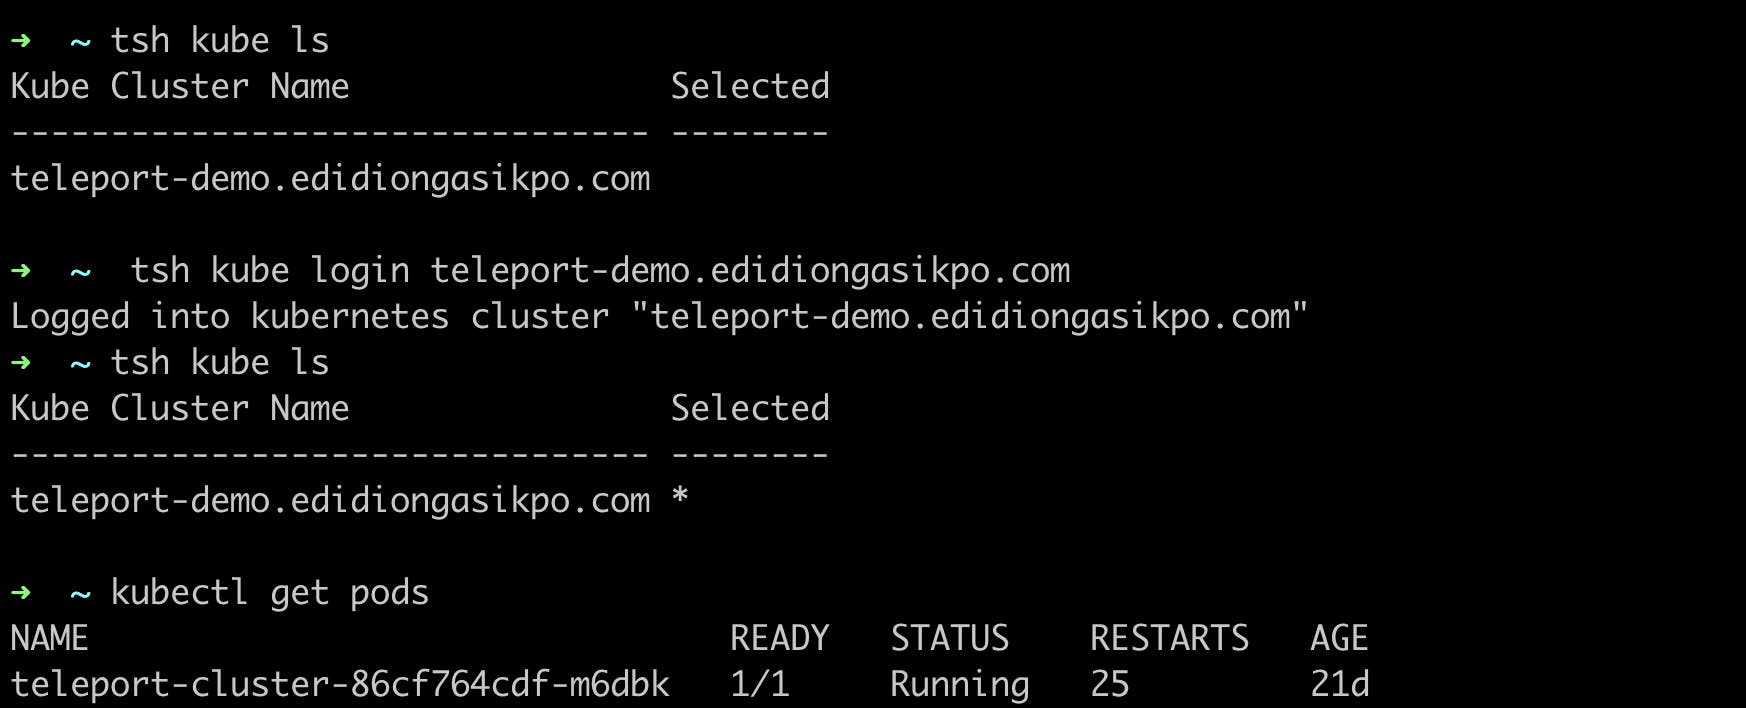
From the image above, you can see that user "Didicodes" has logged into the Kubernetes cluster and can perform her day-to-day activities in the Kubernetes cluster.
Step 6: View the activities performed on the Kubernetes cluster
Remember I mentioned that Teleport can show you all activities performed by developers on the Kubernetes cluster for debugging purposes. Let's see that in action👇
Let's assume user Didicodes wanted to perform some interactive kubectl exec commands on the Kubernetes cluster, she uses the kubectl apply -f https://k8s.io/examples/application/shell-demo.yaml command to add the shell demo pod into the cluster. Then runs this command kubectl exec --stdin --tty shell-demo -- /bin/bash to get a shell to the running container. In the shell, she decides to experiment by running other commands without realizing that one of them will impact the Kubernetes cluster negatively.
Didicodes goes out for lunch and a few moments later you get notified that something isn't working as it should on the Kubernetes cluster. You go to your Teleport Dashboard -> Activity -> Audit Log and realize the last person who accessed & performed an activity on the Kubernetes cluster was Didicodes.

You want to know exactly what Didicodes did but she has gone out for lunch. Since your Kubernetes cluster is connected to Teleport, you click on Activity -> Session Recordings -> Play to see the activities performed by Didicodes.

This gives you a clearer picture of what may have gone wrong, you fixed it and made the Kubernetes cluster operational again. Pretty cool, right? I know!
Summary
In my opinion, Teleport is one of the best DevOps tools because it seamlessly grants infrastructure access without compromising engineering productivity or security.
This article only focused on Teleport can be used to give developers secure access to Kubernetes clusters. If you want to learn more about their other offerings, I recommend checking out their official website.
Thank you for reading this article. I'm looking forward to hearing what you think about Teleport in the comment section. See ya. 💛